
Appearance
Stack Stitching Module Guide
The Stack Stitching module joins several stacks into one volume: z-concatenation, z-overlap, and side-by-side xy mosaics, all through a single placement model. Align once, save the placements as a recipe, and reuse them on sibling volumes (for example: align the raw images, then stitch their segmentations with the same geometry).
For a conceptual overview, see Stack Stitching Module.
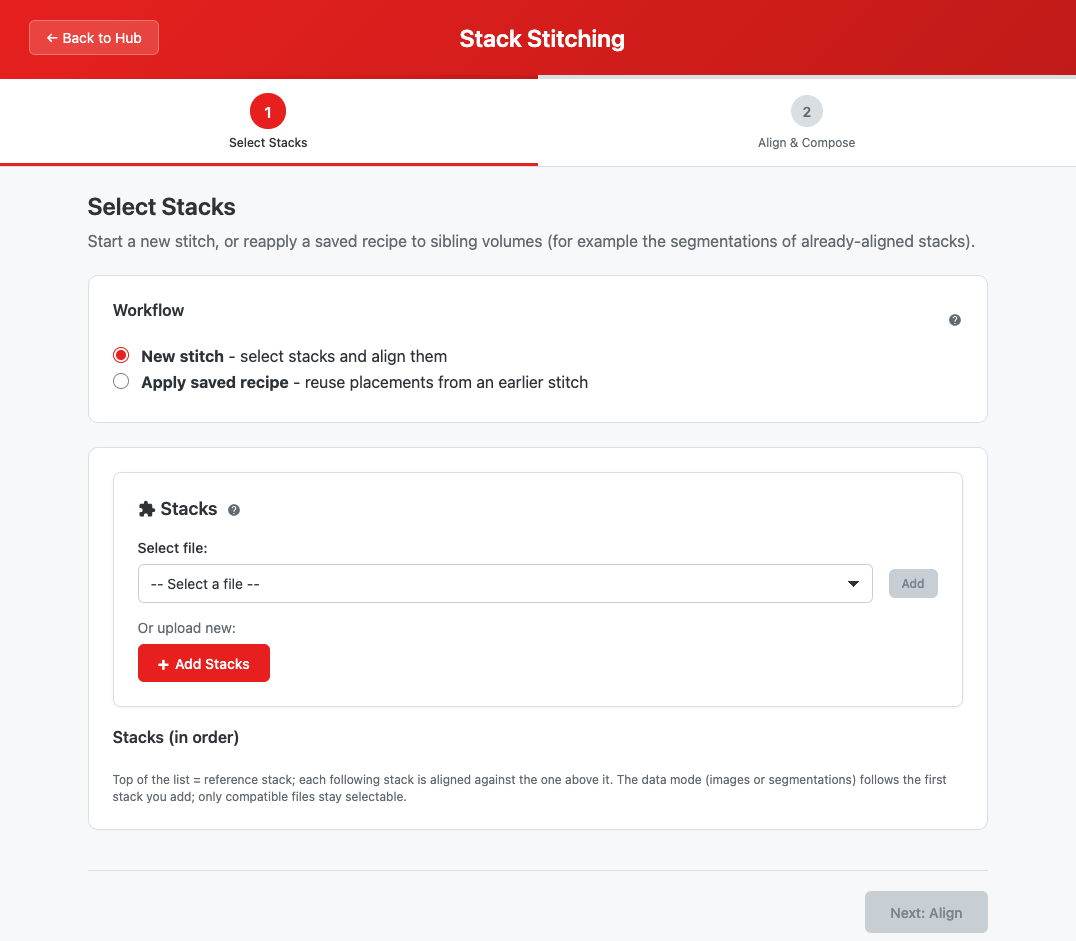 The Stack stitching module landing page showing step navigation, method selection and file selector
The Placement Model
Each stack after the first is placed by two things:
- A declared slice pair — "these two slices are the same physical section" — which fixes the z-offset
- An in-plane transform (dx, dy, rotation) that you align in the overlay viewer
Whether a junction is a z-continuation or a side-by-side mosaic is inferred from how much the two footprints overlap after alignment — it is never asked as a separate question.
Quick Start
The module has two steps: Select Stacks, then Align & Compose.
New Stitch
- Launch module — Click "Stack Stitching" from the workspace hub
- Select stacks — Add two or more stacks; order matters (top = reference)
- Align each junction — In Align & Compose, pick the matching slice pair, click Auto-align, verify with the flicker toggle
- Compose — In the same step, review the placement summary in the toolbar, set the output options, and press Compose
- The result is a stitched TIFF plus a recipe for reuse
Apply a Saved Recipe
- Choose Apply saved recipe in Step 1
- Pick a recipe from an earlier stitch and swap its slots for the volumes to compose now
- Continue with Next: Compose — alignment is skipped, and the Align & Compose step shows composing only
Step-by-Step Guide
Step 1: Select Stacks
Choose between New stitch and Apply saved recipe (workflow details).
New Stitch: Selecting and Ordering
- The top of the list is the reference stack — the top of the assembled volume
- Each following stack is aligned against the one directly above it
- Reorder with the arrows; at least two stacks are needed
Data mode is detected from the first stack you add and shown as a badge: images (grayscale) or label maps (segmentations, annotations). The two modes are never mixed in one stitch — incompatible files are filtered out of the picker. See Selecting and Ordering Stacks.
Applying a Saved Recipe
A recipe holds the placements from an earlier stitch, not its pixels. Swap each slot for the volume you want to compose now — every replacement must sit on the same pixel grid as the original. A recipe aligned on images can be applied to label maps and vice versa. See Applying a Saved Recipe.
Step 2: Align & Compose
Everything after stack selection happens in one step: aligning each junction, then composing the volume from the toolbar's Output section. (With a saved recipe, the alignment part is hidden and the step shows composing only.)
For each junction, three decisions: the slice pair, the in-plane transform, and what happens to duplicated sections.
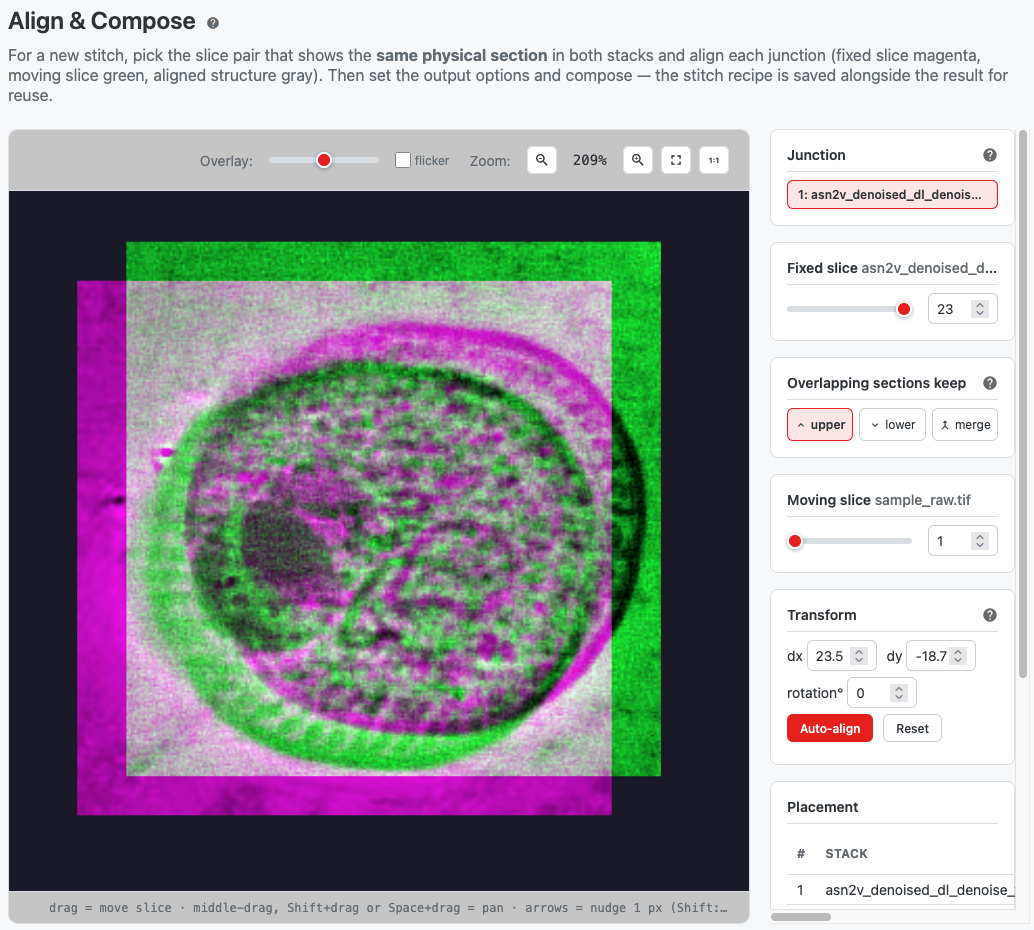 The Align step: fixed slice tinted magenta, moving slice green — registered structure turns gray
Choosing the Slice Pair
Declare one slice from the fixed (upper) stack and one from the moving (lower) stack that show the same physical section:
| Pairing | Meaning |
|---|---|
| Last slice of upper + first slice of lower (the defaults) | Pure z-concatenation, no shared sections |
| Any other pair | The stacks were re-imaged across some sections — those z positions are duplicated (overlap) |
That single choice sets the z-offset for the whole moving stack. See Choosing the Slice Pair.
The Overlay Viewer
| Control | Action |
|---|---|
| Left-drag | Move the moving (green) slice |
| Arrow keys / Shift+arrows | Nudge by 1 px / 10 px |
| Middle-drag, Shift+left-drag, Space+left-drag | Pan the view |
| Mouse wheel | Zoom (0.1×–10×, anchored at cursor) |
| Overlay slider | Moving slice opacity (starts at 50%) |
| Flicker checkbox | Rapidly alternates the two slices — makes small misregistrations easy to spot |
See The Overlay Viewer.
Auto-Align and Confidence
Auto-align estimates dx and dy by phase correlation on the declared slice pair (label stacks use a boundary map). It does not estimate rotation — set that by hand. Each run reports a confidence score in the viewer footer:
| Confidence | Reading |
|---|---|
| > 0.5 | Good |
| ≤ 0.5 | Poor |
| < 0.3 | Warning raised |
If confidence stays low: confirm the pair really shows the same physical section, check for a large rotation, and fall back to manual alignment with the flicker toggle. Any manual move clears the score. See Aligning a Junction.
The Align step: fixed slice tinted magenta, moving slice green — registered structure turns gray
Overlapping Sections Keep
When sections are duplicated at a junction, choose what happens to them:
| Option | Effect |
|---|---|
| Upper | Keep the upper stack's slices, trim the lower copies |
| Lower | Keep the lower stack's slices, trim the upper copies |
| Merge | Keep both and average them at each duplicated z (images only — disabled for label maps) |
The setting only affects continuation junctions; for side-by-side mosaics there are no duplicated z positions and it is ignored. See Overlapping Sections Keep.
Composing the Volume
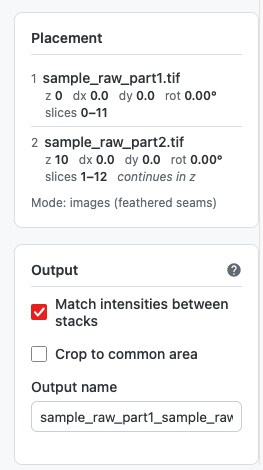 The placement summary and Output section in the Align & Compose toolbar
When the junctions are aligned (or the recipe slots filled), compose from the toolbar: the Placement Summary lists every stack with its z offset, dx, dy, rotation, and kept slice range, plus a per-junction note: "continues in z", "continues in z, merged", or "side by side". Seam handling is automatic: images get feathered seams; label maps use nearest-neighbor with hard seams by design.
Options:
| Option | Description |
|---|---|
| Match intensities between stacks | Rescales each stack to the reference's mean/sd — recommended when stacks came from separate sessions (grayscale only) |
| Crop to common area | Output only the xy region all stacks share, instead of a union canvas |
| Output name | Basename of the stitched TIFF |
The stitch is streamed slice by slice; the composer reports warnings rather than failing silently (dtype casts, ignored merge flags on label maps, differing label sets, filled z gaps). See Composing the Volume.
Output Files
| Output | Description |
|---|---|
| Stitched volume | Multi-page TIFF in the results area |
Recipe (stitch_recipe.json) | Saved next to the output with workspace-relative paths — reapply it to sibling volumes |
Troubleshooting
| Issue | Possible Cause | Solution |
|---|---|---|
| A stack won't appear in the picker | Wrong data mode | Images and label maps are never mixed; remove all stacks to reset the mode |
| Auto-align confidence low | Wrong slice pair or large rotation | Verify the pair shows the same section; set rotation manually; use flicker to check |
| Merge button disabled | Label maps mode | Class IDs cannot be averaged; duplicated sections keep the upper stack |
| Composer warns about label sets | A stack has classes the reference lacks | Expected if segmentations differ; check the classes at the junction |
| Result has averaged sections you didn't expect | Hand-edited recipe with overlapping kept ranges | Review the recipe's slice ranges |
| Recipe won't apply cleanly | Replacement stack on a different pixel grid | Every slot swap must match the original's grid (same acquisition/downscaling) |