Appearance
Deep Learning Denoising Module
Remove noise from microscopy images using self-supervised deep learning. No clean reference images required.
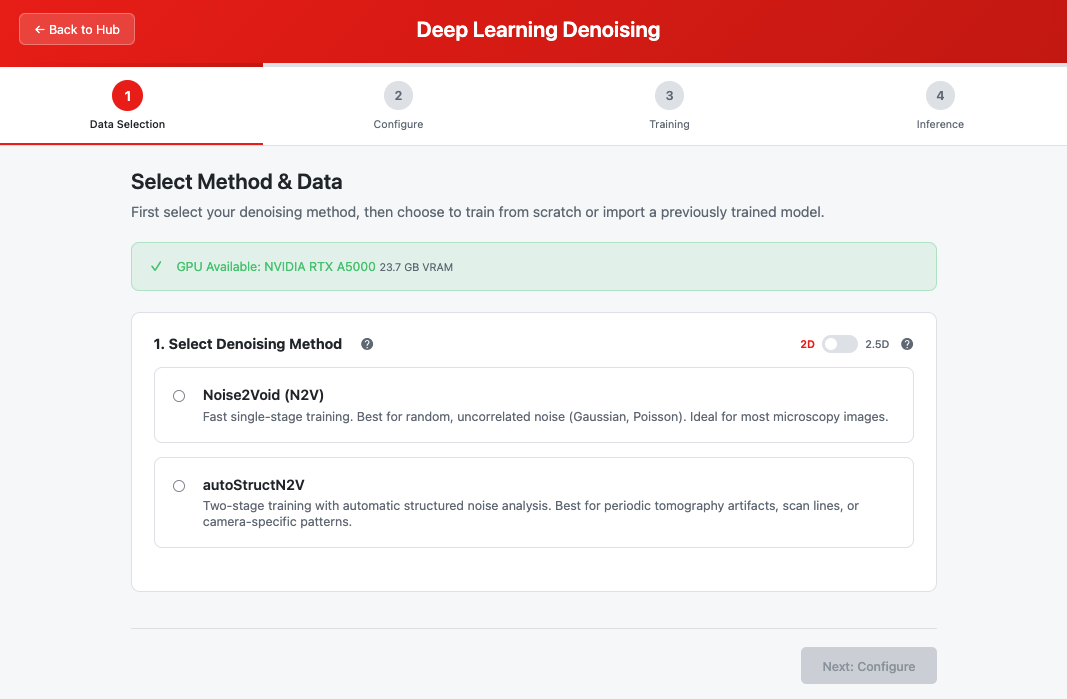 The DL Denoising module showing method selection, mode toggle, and workflow options
Overview
The Deep Learning Denoising module provides two self-supervised denoising methods:
| Method | Training | Best For | Complexity |
|---|---|---|---|
| N2V (Noise2Void) | Single stage | Random, uncorrelated noise (Gaussian, Poisson) | Simple |
| autoStructN2V | Two stages + mask extraction | Structured noise (scan lines, periodic artifacts, camera patterns) | Advanced |
Both methods learn to denoise from noisy images alone—no clean ground truth required.
For method selection guidance, see Denoising Method.
When to Use Each Method
| Your Images Have... | Recommended Method |
|---|---|
| Random speckle noise | N2V |
| Poisson (shot) noise | N2V |
| Gaussian noise | N2V |
| Horizontal/vertical scan lines | autoStructN2V |
| Periodic stripe artifacts | autoStructN2V |
| Camera-specific fixed patterns | autoStructN2V |
| Tomography reconstruction artifacts | autoStructN2V |
Quick Start
Decision Flowchart
Start
  │
  ├─ Do you have a pretrained model?
  │     │
  │     ├─ YES → Import Model workflow (skip training)
  │     │
  │     └─ NO → Continue
  │
  ├─ Does your noise have visible patterns or structure?
  │     │
  │     ├─ YES → Use autoStructN2V
  │     │
  │     └─ NO (random noise) → Use N2V
  │
  ├─ Is noise correlated between slices? (volumetric data)
  │     │
  │     ├─ YES → Use 2.5D mode (requires 20+ slices)
  │     │
  │     └─ NO → Use 2D mode
  │
  └─ Configure → Train → Done
N2V Quick Path
- Launch module → Select N2V → Keep 2D mode
- Choose Train from Scratch → Upload your noisy TIFF stack
- Use Balanced preset (or customize)
- Click Start Denoising → Wait for completion
- View results in Image Viewer
autoStructN2V Quick Path
- Launch module → Select autoStructN2V → Choose 2D or 2.5D mode
- Choose Train from Scratch → Upload your noisy TIFF stack
- Use Balanced preset (or customize both stages)
- Click Start Denoising
- After Stage 1: Review the extracted mask → Approve & Continue
- Wait for Stage 2 → View results
Step-by-Step Guide
Step 1: Method & Data Selection
Step 1 guides you through three decisions: method, mode, and workflow.
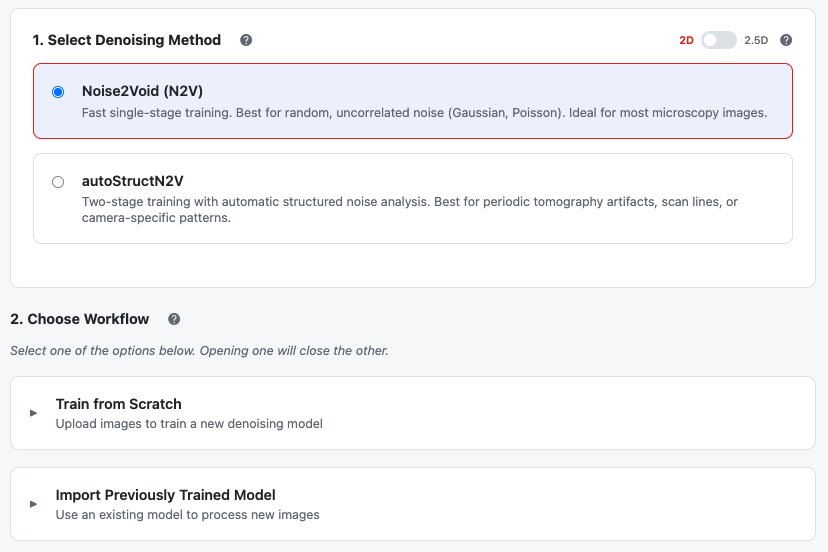 Select your denoising method, toggle 2D/2.5D mode, then choose a workflow
1. Select Denoising Method
Choose between the two methods at the top of the step:
| Option | Description |
|---|---|
| Noise2Void (N2V) | Fast single-stage training. Best for random noise. |
| autoStructN2V | Two-stage training with automatic structured noise analysis. Best for patterned artifacts. |
See Denoising Method for detailed guidance.
2. Select Processing Mode (2D / 2.5D)
Use the toggle switch in the top-right corner of the method selection card:
| Mode | Description | Requirements |
|---|---|---|
| 2D (default) | Process each slice independently | Any stack size |
| 2.5D | Process triplets (Z-1, Z, Z+1) using inter-slice context | Minimum 20 slices |
When to use 2.5D mode:
- Volumetric data with correlated structures across slices
- EM tomography and confocal microscopy stacks
- Noise patterns that span multiple slices
- When preserving 3D structural continuity is important
2.5D requirements:
- Minimum 20 slices in the stack
- Slices should be spatially contiguous (not random samples)
- More GPU memory required (3x input channels)
Important for autoStructN2V: In 2.5D mode, the mask extraction phase shows a 3-slice triplet mask instead of a single 2D mask. See Step 3: Mask Extraction (2.5D) for details.
See 2D vs 2.5D Processing Mode for more details.
3. Choose Workflow
After selecting a method, two workflow options appear:
Option A: Train from Scratch
Expand Train from Scratch to upload your data:
- Click the file selector
- Choose a TIFF stack from your workspace or upload a new file
- Wait for validation (green checkmark)
- For 2.5D mode: validation checks that the stack has at least 20 slices
- Click Next: Configure
See Input Data for file requirements.
Option B: Import Previously Trained Model
Expand Import Previously Trained Model to use an existing model:
For N2V:
| File | Description |
|---|---|
| Config (.json) | Training configuration. See Config File |
| Model (.pth) | Trained model weights. See Model File |
For autoStructN2V:
| File | Description |
|---|---|
| Config (.json) | Training configuration |
| Stage 1 Model (.pth) | Stage 1 trained weights |
| Stage 2 Model (.pth) | Stage 2 trained weights |
Note: When importing a model, Steps 2 and 3 are skipped. Proceed directly to Step 4 (Inference).
Step 2: Configure Training
This step is only shown for the Train from Scratch workflow.
Configure your training parameters. The interface differs based on your selected method.
Presets
Start with a preset to set all parameters at once:
| Preset | Description |
|---|---|
| Fast | Quick training, lower quality. Good for testing. |
| Balanced | Recommended for most cases. Good quality with reasonable training time. |
| High Quality | Best results, longer training time. Use when quality is critical. |
N2V Configuration (Single Column)
For N2V, you'll see a single configuration form:
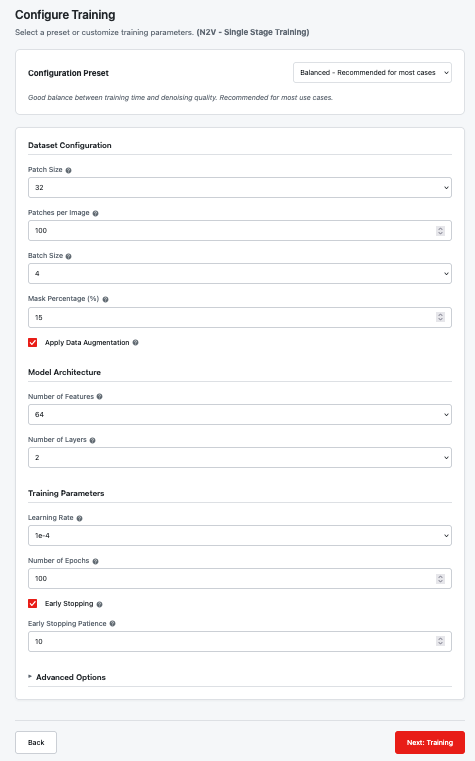 N2V single-stage configuration
Parameter Summary
| Category | Parameter | Default | Help Article |
|---|---|---|---|
| Dataset | Patch Size | 64 | Patch Size |
| Patches per Image | 100 | Patches per Image | |
| Batch Size | 8 | Batch Size | |
| Mask Percentage | 15% | Mask Percentage | |
| Data Augmentation | On | Augmentation | |
| Architecture | Number of Features | 64 | Features |
| Number of Layers | 4 | Number of Layers | |
| Training | Learning Rate | 1e-4 | Learning Rate |
| Epochs | 100 | Epochs | |
| Early Stopping | On | Early Stopping |
Advanced Options (collapsed by default):
- Resize Convolution: Resize Conv
- Upsampling Mode: Upsampling Mode
- Masking Strategy: Masking Strategy
autoStructN2V Configuration (Dual Column)
For autoStructN2V, you'll see a side-by-side layout for both training stages:
 autoStructN2V two-stage configuration with Stage 1 (left) and Stage 2 (right)
Stage 1 vs Stage 2 Defaults
| Parameter | Stage 1 | Stage 2 | Notes |
|---|---|---|---|
| Patch Size | 32 | 64 | Stage 2 uses larger patches |
| Patches per Image | 100 | 200 | More patches in Stage 2 |
| Batch Size | 4 | 2 | Smaller batches in Stage 2 |
| Mask Percentage | 15% | 10% | Lower masking in Stage 2 |
| Learning Rate | 1e-4 | 1e-5 | Lower learning rate in Stage 2 |
| Data Augmentation | Off | On | Augmentation disabled in Stage 1 |
Important: Stage 1 augmentation is automatically disabled for autoStructN2V. This preserves structural noise patterns needed for mask extraction.
Mask Extractor Configuration
Below the stage columns, expand Mask Extractor Configuration to adjust how structural noise patterns are detected:
| Parameter | Default | Description | Help Article |
|---|---|---|---|
| Adaptive Thresholding | On | Automatically adjust threshold per slice | Adaptive Thresholding |
| Base Percentile | 50% | Starting threshold for noise detection | Base Percentile |
| Percentile Decay | 1.15 | Rate at which threshold adapts | Percentile Decay |
| Max Masked Pixels | 25 | Maximum active pixels in the mask | Max Masked Pixels |
Click Next: Training when configuration is complete.
Step 3: Training
This step is only shown for the Train from Scratch workflow.
The training interface differs significantly between N2V and autoStructN2V.
N2V Training (Single Stage)
For N2V, click Start Denoising to begin training:
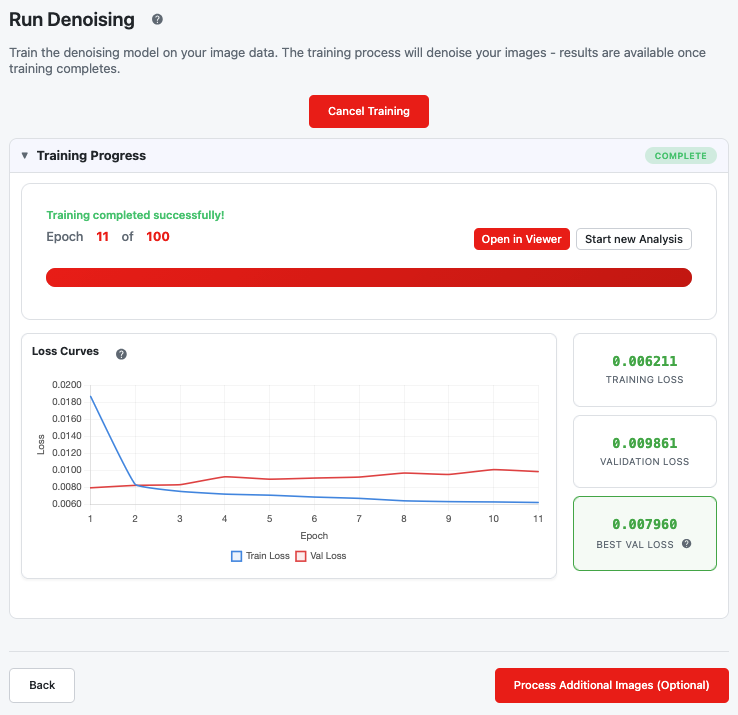 N2V single-stage training progress
During Training:
- Progress bar shows current epoch
- Loss chart displays training and validation loss
- Metrics cards show current and best validation loss
Training Completion:
- Status changes to "Complete"
- Open in Viewer and Start new Analysis buttons appear
- You can proceed to Step 4 to denoise additional images
Tip: You don't need to watch the entire training process. Feel free to explore other modules while training continues in the background. Note that only one denoising training can run at a time.
autoStructN2V Training (Multi-Stage)
autoStructN2V training consists of three phases displayed in collapsible sections:
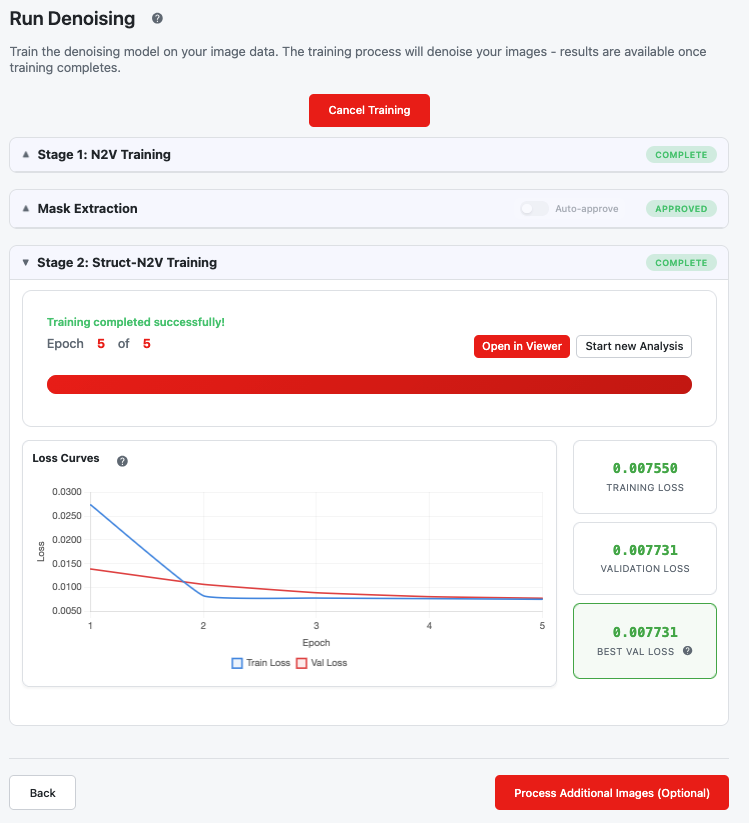 autoStructN2V three-phase training interface
Phase 1: Stage 1 N2V Training
Click Start Denoising to begin. Stage 1 trains a standard N2V model:
- Progress bar shows epoch progress
- Loss chart tracks training/validation loss
- Status updates: "Pending" → "Training" → "Complete"
When Stage 1 completes, the mask extraction phase begins automatically.
Phase 2: Mask Extraction
After Stage 1, the module analyzes the difference between noisy input and Stage 1 output to extract a structural noise mask.
Mask Extraction (2D Mode)
In 2D mode, you'll see a single mask grid:
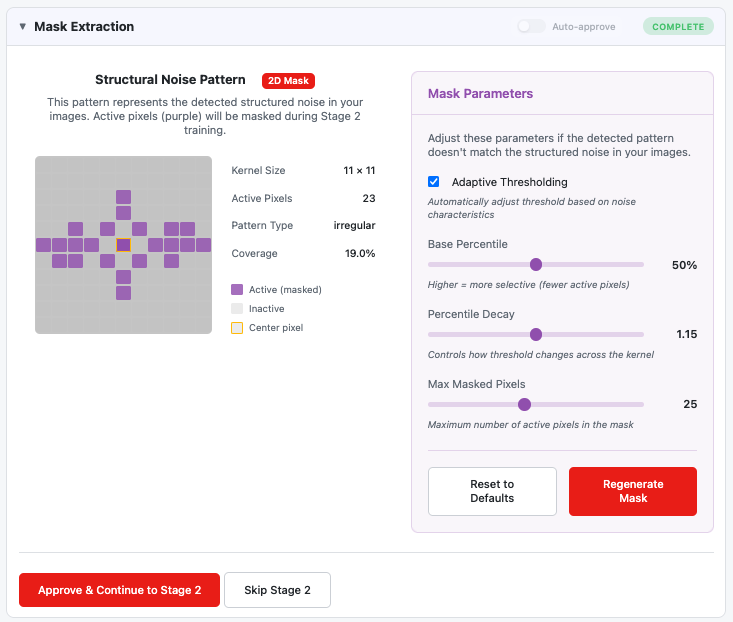 2D mask extraction showing a single detected noise pattern
Mask Display:
- Single grid showing the detected structural noise pattern
- Active pixels (purple) represent positions where structured noise was detected
- Center pixel (highlighted) is the reference position
- Statistics: kernel size, active pixel count, coverage percentage
Mask Extraction (2.5D Mode)
In 2.5D mode, the mask becomes a triplet showing patterns for three Z-positions:
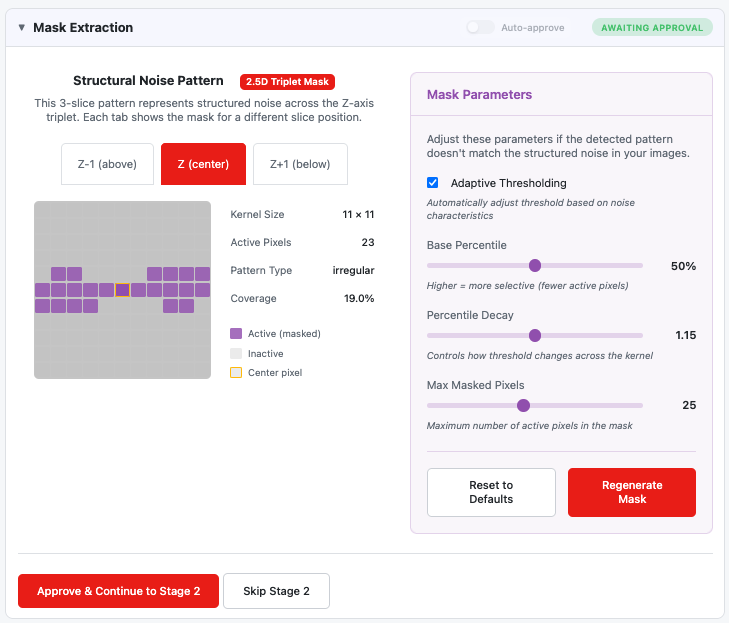 2.5D triplet mask extraction with three slice tabs
Triplet Mask Interface:
- Three tabs at the top: "Z-1 (above)", "Z (center)", "Z+1 (below)"
- Each tab shows the mask for that slice position in the triplet
- Click tabs to switch between slice views
- The 3D mask captures noise correlations across the Z-axis
Interpreting the Triplet Mask:
| Tab | Shows | Meaning |
|---|---|---|
| Z-1 (above) | Mask for slice above center | Noise correlations from previous slice |
| Z (center) | Mask for center slice | Primary structural noise pattern |
| Z+1 (below) | Mask for slice below center | Noise correlations from next slice |
Different slices may show different patterns if the structured noise varies across the Z-axis.
Mask Actions
| Button | Description |
|---|---|
| Approve & Continue to Stage 2 | Accept the mask and proceed to Stage 2 training |
| Skip Stage 2 | Use Stage 1 results only (if no structure detected) |
Auto-approve Toggle: Enable Auto-approve (toggle in header) to automatically approve the mask and continue to Stage 2 without manual intervention. Useful for batch processing.
Adjusting the Mask: If the detected pattern doesn't look right, use the parameter panel to adjust:
- Modify Base Percentile, Percentile Decay, or Max Masked Pixels
- Click Regenerate Mask
- Review the new mask (check all three tabs in 2.5D mode)
- Approve when satisfied
Phase 3: Stage 2 Struct-N2V Training
After mask approval, Stage 2 trains using the extracted mask:
- Progress and metrics display similar to Stage 1
- Stage 2 specifically targets the structured noise patterns identified in the mask
- In 2.5D mode, the 3D mask guides the network to ignore correlated noise across slices
- Status: "Pending" → "Training" → "Complete"
When Stage 2 Completes:
- Open in Viewer button appears
- Final denoised result is the Stage 2 output
- You can compare Stage 1 vs Stage 2 results in the Image Viewer
Step 4: Process Additional Data (Optional)
Apply your trained model to denoise additional images without retraining.
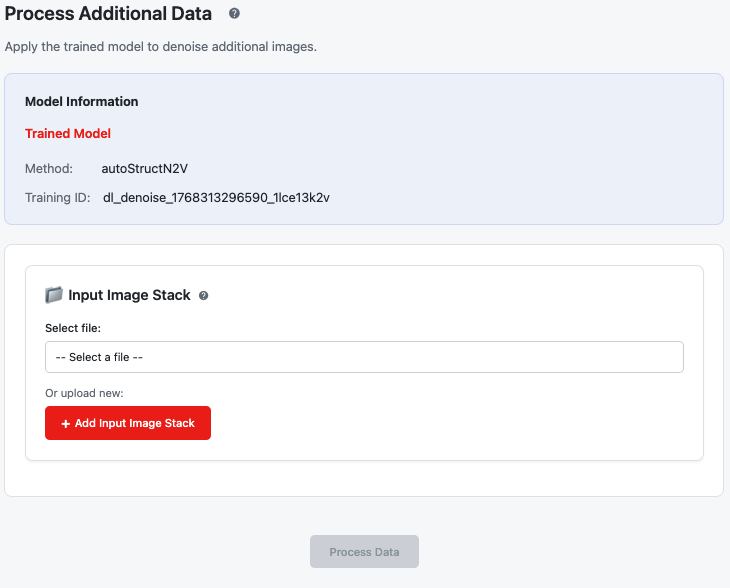 Apply the trained model to new data
Model Information
A summary card shows your model details:
- Method used (N2V or autoStructN2V)
- Training mode (2D or 2.5D)
- When training completed
Process New Images
- Click the file selector to choose additional data
- Select a TIFF stack from your workspace
- For 2.5D models: new data should also have sufficient slices
- Click Process Data
- Monitor the progress bar
- When complete, click Open in Image Viewer or Process More
See Inference Data and Inference Overview.
Output Files
The module saves files to your workspace:
| Output | Location | Description |
|---|---|---|
| Denoised images | results/<training-id>/ | Denoised TIFF stack |
| Trained model | models/<session>/<training-id>/ | Model weights (.pth) |
| Configuration | models/<session>/<training-id>/ | Training config (.json) |
| Mask (autoStructN2V) | models/<session>/<training-id>/ | Extracted noise mask |
For autoStructN2V, both Stage 1 and Stage 2 outputs are saved.
Troubleshooting
| Issue | Possible Cause | Solution |
|---|---|---|
| "Insufficient Stack Depth for 2.5D" | Stack has fewer than 20 slices | Switch to 2D mode or use a larger stack |
| Training very slow | Large images or many epochs | Reduce patch size, use Fast preset, or wait |
| Poor denoising quality | Wrong method for noise type | Try the other method (N2V ↔ autoStructN2V) |
| Artifacts remain after N2V | Structured noise present | Switch to autoStructN2V |
| Empty mask extracted | No detectable structure | Use Skip Stage 2 or try N2V instead |
| Mask shows random pattern | Threshold too sensitive | Increase Base Percentile, reduce Max Masked Pixels |
| 2.5D triplet mask looks inconsistent | Noise varies across slices | This may be correct; check each tab individually |
| Stage 2 worse than Stage 1 | Mask captured wrong pattern | Adjust mask parameters and regenerate |
| GPU not detected | CUDA not available | Training will use CPU (slower) |
| Out of memory | Batch size too large | Reduce batch size (especially in 2.5D mode) |
Method Details: N2V
Noise2Void (N2V) is a self-supervised denoising method that works by:
- Blind-spot training: During training, the network learns to predict each pixel's value from its surrounding context, without seeing the pixel itself
- Self-supervision: The noisy image serves as both input and target
- Assumption: Noise is pixel-independent (random, uncorrelated)
In 2.5D mode: The network takes 3 consecutive slices as input and predicts only the center slice, leveraging inter-slice context for better denoising.
Strengths:
- Fast single-stage training
- Works well for most microscopy noise
- Simple configuration
Limitations:
- Cannot handle structured or correlated noise
- May leave pattern artifacts from camera or reconstruction
For more details, see N2V Training.
Method Details: autoStructN2V
autoStructN2V extends N2V to handle structured noise through a two-stage approach:
Stage 1: Initial N2V Training
- Trains a standard N2V model
- Output: Partially denoised image (random noise removed, structured noise remains)
Mask Extraction:
- Compares noisy input with Stage 1 output
- Identifies pixels with consistent residual patterns
- Generates a "structN2V mask" showing which pixel relationships to exclude
- In 2.5D mode: Generates a 3D triplet mask capturing patterns across Z-1, Z, and Z+1 positions
Stage 2: Struct-N2V Training
- Trains using the extracted mask
- The mask tells the network which neighboring pixels might share correlated noise
- In 2.5D mode: The 3D mask guides cross-slice noise handling
- Output: Fully denoised image (both random and structured noise removed)
Strengths:
- Automatically detects structured noise patterns
- No manual mask creation required
- Effective for scan lines, periodic artifacts, camera patterns
- 2.5D mode captures 3D noise correlations
Limitations:
- Longer training time (two stages)
- Requires sufficient structural noise for mask extraction
- More parameters to configure
For more details, see autoStructN2V Training and autoStructN2V Details.
Related Help Articles
Module Overview
Step 1: Method & Data Selection
- Denoising Method
- 2D vs 2.5D Processing Mode
- Workflow Selection
- Input Data
- Import Config File
- Import Model File
Step 2: Configuration
- Configuration Overview
- Patch Size
- Patches per Image
- Batch Size
- Mask Percentage
- Augmentation
- Features
- Number of Layers
- Learning Rate
- Epochs
- Early Stopping
Step 2: Mask Extractor (autoStructN2V)
Step 3: Training
- Training Overview
- N2V Training
- autoStructN2V Training
- Loss Metrics
- Best Validation Loss
- autoStructN2V Details