Appearance
Segmentation Module
Train U-Net models for biomedical image segmentation or use pretrained models to segment new data.
 The Segmentation module showing the step navigation and workflow selection
Overview
The Segmentation module provides a complete machine learning pipeline for training and applying U-Net segmentation models. It supports two workflows:
| Workflow | Description | Steps |
|---|---|---|
| Train from Scratch | Train a new model using your images and annotations | Step 1 → Step 2 → Step 3 → Step 4 |
| Import Pretrained Model | Use an existing model to segment new data | Step 1 → Step 4 (skip Steps 2-3) |
For more background, see Segmentation Overview.
Quick Start
Training Workflow
- Launch the Segmentation module from the Hub
- Expand "Train from Scratch" and select your raw images and annotations
- Configure training parameters (or use defaults)
- Start training and monitor progress
- Upload inference data and run segmentation
Import Model Workflow
- Launch the Segmentation module from the Hub
- Expand "Use Pretrained Model" and select your model (.pth) and config (.json) files
- Skip to Step 4, upload inference data, and run segmentation
Step-by-Step Guide
Step 1: Training Data or Model Selection
This step offers two mutually exclusive workflows. Expanding one section will collapse the other. For help choosing, see Workflow Choice.
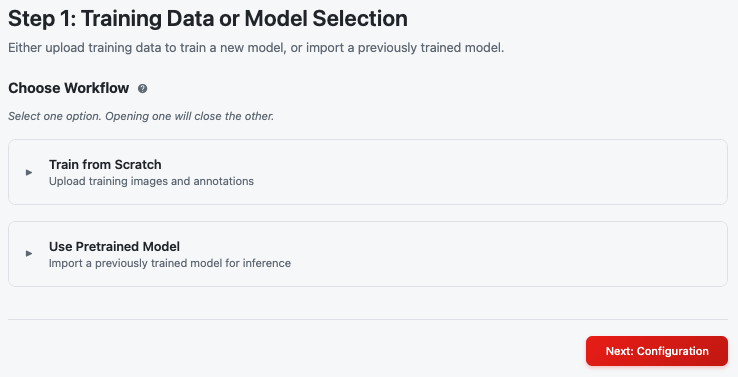 Choose between training a new model or importing an existing one
Option A: Train from Scratch
Expand the Train from Scratch section to upload your training data:
| Input | Format | Description |
|---|---|---|
| Raw Images | TIFF stack | Your microscopy images for training. See Raw Images |
| Annotations | TIFF stack | Corresponding segmentation masks (same dimensions). See Annotations |
Both files must have matching dimensions (width, height, number of slices).
To select files:
- Click the file selector for each input type
- Choose a file from your workspace or upload a new one
- Wait for validation to complete (green checkmark indicates success)
- Click Next: Configuration when both files are validated
Option B: Use Pretrained Model
Expand the Use Pretrained Model section to import an existing model:
| Input | Format | Description |
|---|---|---|
| Model File | .pth | PyTorch model weights. See Model File |
| Config File | .json | Model configuration (architecture, classes). See Config File |
Note: When using a pretrained model, Steps 2 and 3 are skipped. After validation, click Next to proceed directly to Step 4 (Inference).
Step 2: Training Configuration
This step is only shown for the Train from Scratch workflow.
Configure how your model will be trained. Default values work well for most cases.
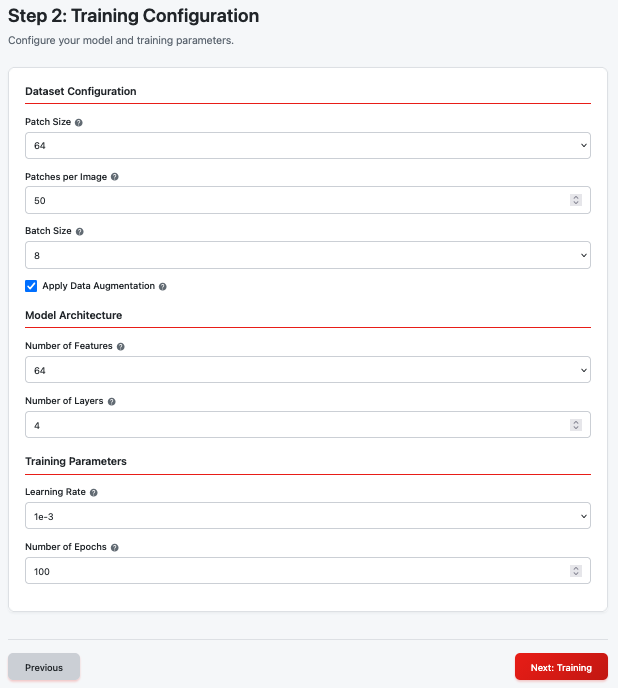 Training configuration with dataset, architecture, and training parameters
Dataset Configuration
| Parameter | Default | Options | Help Article |
|---|---|---|---|
| Patch Size | 64 | 32, 48, 64, 96, 128, 256 | Patch Size |
| Patches per Image | 50 | 1–100 | Patches per Image |
| Batch Size | 8 | 1, 2, 4, 8, 16, 32 | Batch Size |
| Data Augmentation | Enabled | On/Off | Augmentation |
Model Architecture
| Parameter | Default | Options | Help Article |
|---|---|---|---|
| Number of Features | 64 | 32, 48, 64, 96, 128 | Number of Features |
| Number of Layers | 4 | 2–6 | Number of Layers |
Training Parameters
| Parameter | Default | Options | Help Article |
|---|---|---|---|
| Learning Rate | 1e-3 | 1e-5 to 2e-3 | Learning Rate |
| Number of Epochs | 100 | 10–500 | Number of Epochs |
Click Next: Training when you're satisfied with your configuration.
Step 3: Training Progress
This step is only shown for the Train from Scratch workflow.
Monitor your model as it learns to segment your images. For details on interpreting training metrics, see Training Progress.
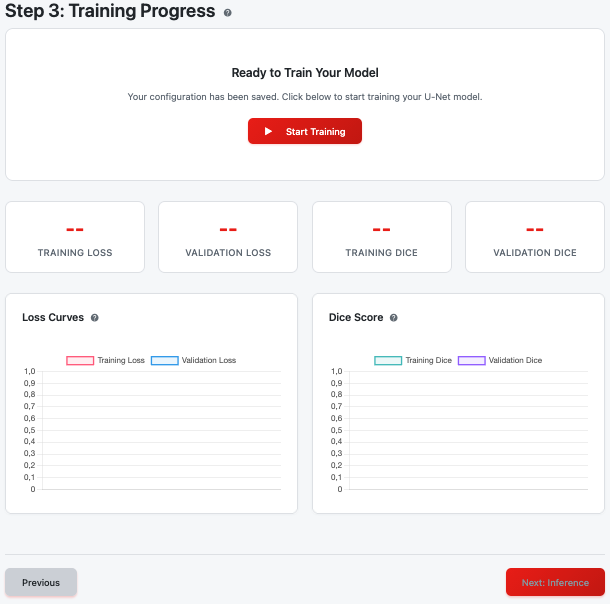 Training progress with real-time metrics and charts
Starting Training
- Review your configuration summary
- Click Start Training to begin
- The progress display will show:
- Current epoch / total epochs
- Progress bar
- Real-time metrics (Training Loss, Validation Loss, Training Dice, Validation Dice)
Training Charts
| Chart | Description | Help Article |
|---|---|---|
| Loss Curves | Shows training and validation loss over epochs | Loss Curves |
| Dice Score | Shows segmentation accuracy over epochs | Dice Score |
Good training shows both curves converging, with validation metrics close to training metrics.
During Training
Tip: You don't need to watch the entire training process. Feel free to explore other modules while training continues in the background. Note that only one training session can run at a time.
- Cancel Training: Click Cancel Training if you need to stop early
- Page Refresh: If you accidentally refresh the page, the module will detect an active training session and offer to resume monitoring
Training Completion
When training finishes:
- The Next: Inference button becomes enabled
- Your trained model is automatically saved
- Metrics display shows final values
Click Next: Inference to proceed.
Step 4: Run Inference
Apply your trained (or imported) model to segment new data. See Inference Overview.
 Upload data and run segmentation with your model
Select Inference Data
- Click the file selector to choose your inference data
- Select a TIFF stack from your workspace or upload a new one
- The data should be similar to your training images (same modality, resolution)
For data requirements, see Inference Data.
Run Segmentation
- Click Run Segmentation after selecting valid data
- Monitor the progress bar showing slice-by-slice processing
- Wait for the completion message
After Completion
When segmentation finishes, you'll see two options:
| Action | Description |
|---|---|
| Open in Image Viewer | View your segmentation results immediately. See the Image Viewer Guide for navigation controls |
| Start New Analysis | Reset the module to begin a new training or inference workflow |
Output Files
The Segmentation module saves files to your workspace:
| Workflow | Output Location | Files |
|---|---|---|
| Training | models/<session>/<training-id>/ | best_model.pth, config.json, results.json |
| Inference | results/<inference-id>/ | Segmented TIFF stack, metadata JSON |
These files appear in your workspace file browser after processing completes.
Troubleshooting
| Issue | Possible Cause | Solution |
|---|---|---|
| Validation fails for training data | Dimension mismatch between images and annotations | Ensure both TIFF stacks have identical dimensions |
| Training loss not decreasing | Learning rate too high or data issue | Try reducing learning rate; verify annotations are correct |
| Poor segmentation quality | Insufficient training data or epochs | Add more training data or increase epoch count |
| "Model file invalid" error | Incompatible model architecture | Ensure model and config files are from the same training session |
| Inference very slow | Large image stack | This is normal; processing is slice-by-slice |
Related Help Articles
Module Overview
Step 1: Data Selection
Step 2: Configuration
- Patch Size
- Patches per Image
- Batch Size
- Augmentation
- Number of Features
- Number of Layers
- Learning Rate
- Number of Epochs